Mince Pies

Ingredients
  • 225g cold butter , diced
  • 350g plain flour
  • 100g golden caster sugar
  • 280g mincemeat
  • 1 small egg , beaten
  • icing sugar , to dust


Method

  1. To make the pastry, rub the butter into the flour, then mix in the sugar and a pinch of salt. Combine the pastry into a ball - don't add liquid - and knead it briefly. The dough will be fairly firm, like shortbread dough. You can use the dough immediately, or chill for later.
  2. Preheat the oven to 200C/gas 6/fan 180C.
  3. Roll out the pastry and cut out large circles and line the cupcake tin. Make the lids by cutting smaller circles. Add 1 teaspoon of mincemeat to each pie base. Top the pies with their lids, pressing the edges gently together to seal - you don't need to seal them with milk or egg as they will stick on their own. (The pies may now be frozen for up to 1 month).
  4. Brush the tops of the pies with the beaten egg. Bake for 20 minutes until golden. Leave to cool in the tin for 5 minutes, then remove to a wire rack. To serve, lightly dust with icing sugar. They will keep for 3 to 4 days in an airtight container.
  5. The number of pies made will depend on the size that you make but this recipe should make approx 16 mince pies.

Made these with the mincemeat below and they are great and very quick and simple to make, and I still have loads of mincemeat left!! That aught to be goo as I don't think they are going to last very long!!

Hey! I'd love to know if people are using my recipes!! If you are leave a wee comment on the recipes post! Also, why not head back and let me know how you got on!!?
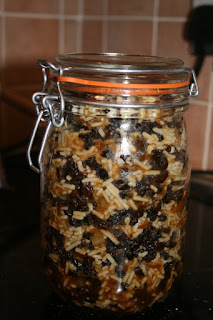
Home Made Mincemeat

Ingredients
  • 1 Bramley Apple
  • 300g Raisins
  • 300g Currants
  • 250g shredded suet
  • 250g muscavado sugar
  • 85g mixed peel, chopped
  • pinch of nutmeg
  • pinch of mixed spice
  • grated zest and juice of 1 lemon
  • 100ml whisky (optional)


Method

  1. Peel and grate the apple and set it aside. Mix all the other ingredients in the order that they appear, except the whisky (if using).
  2. Stir through the apple, then add the whisky (if using) once all the other ingredients are combined.
  3. Pack mincemeat into sterilized jars.
  4. Seal, leave for 2 weeks before using to get the best flavour although can be used immediately. Will keep for 6 months.
Loved this mincemeat, I am not a liker of the whisky so I missed it out, I have added it in as I know it is more traditional that way. I also used it right away without waiting and it tastes fine!!

Hey! I'd love to know if people are using my recipes!! If you are leave a wee comment on the recipes post! Also, why not head back and let me know how you got on!!?

Cheese Twists


Ingredients
  • 1 Sheet of Ready-Rolled Puff PAstry
  • 200g mature cheddar cheese, grated
  • milk to seal


Method

  1. Unroll the pastry sheet and brush all over with milk.
  2. Spread the cheese over half of the sheet allowing for a margin of about 1/2 inch at each edge.
  3. Fold the pastry over to make a a parcel of cheese and press down to ensure it is sealed.
  4. Using a sharp knife cut the parcels into strips about 1 inch wide.
  5. Before placing each strip onto a greased baking sheet twist the strip ans press the ends onto the tray to ensure it keeps its shape.
  6. Cook in the oven 180 oC for approxiamtely 30mins or until pastry is puffed, crispy and golden.
  7. Remove and serve hot or cold.

I love these things and they are so easy to make but they make great finger food at a party and with Christmas just around the corner anything quick for the guests is a bonus!!!

Hey! I'd love to know if people are using my recipes!! If you are leave a wee comment on the recipes post! Also, why not head back and let me know how you got on!!?

Cranberry & Macadamia Cookies in a jar


INGREDIENTS
  • 80 g all-purpose flour
  • 40 g rolled oats
  • 60 g all-purpose flour
  • 2 g bicarbonate of soda
  • 3 g salt
  • 75 g dark brown sugar
  • 65 g white sugar
  • 100 g plain chocolate chips
  • 80 g cranberries
  • 80 g macadamia nuts, halved

Method
  1. Layer the ingredients in a 1 litre jar, in the order listed.
  2. Attach a tag with the following instructions: Cranberry & Macadamia Cookies 1. Preheat oven to 175 degrees C (350 degrees F). Grease a cookie sheet or line with parchment paper. 2. In a medium bowl, beat together 100g cup softened butter, 1 egg and 1 teaspoon of vanilla until fluffy. Add the entire jar of ingredients, and mix together by hand until well blended. Drop by heaping spoonfuls onto the prepared baking sheets. 3. Bake for 8 to 10 minutes, or until edges start to brown. Cool on baking sheets, or remove to cool on wire racks.

I love Cranberry and Macadamia Nut Mix at Christmas and just had to get it into a biscuit!! (For those of you in Britain, Tesco's Cranberry and Macadamia mix is great for these, 1 160g bag!) I think putting mix into a jar as a gift is just wonderful and these biscuits are so good I think I will make one as a present for myself!!!

Hey! I'd love to know if people are using my recipes!! If you are leave a wee comment on the recipes post! Also, why not head back and let me know how you got on!!?

Chicken Risotto

Ingredients

  • 250g risotto rice
  • 8 large mushrooms
  • 1 red onion, sliced
  • 3 cloves of garlic, crushed
  • 4 rashers of bacon, diced
  • 500ml chicken stock
  • 300g cooked chicken
  • salt and pepper


Method

  1. Fry the onion and mushrooms together with the garlic in a little vegetable oil for about 6 minutes.
  2. Move the onion to the side of the pan and add the rice. Fry until brown, keep the rice moving all the time.
  3. Once rice is browned mix together with the onions and mushrooms. Season well with the salt and pepper.
  4. Add the bacon and allow to cook.
  5. Mix the mixture together with the stock and allow to reduce until all of the liquid has gone.
  6. Add the chicken and allow to heat through.
  7. Serve with grated cheese and a nice crusty loaf.
This is a great recipe to use up the rest of that Sunday roast. I even used the chicken remains to make my own stock!! This is a really filling and tasty recipe, definately one for the cold nights!!

Hey! I'd love to know if people are using my recipes!! If you are leave a wee comment on the recipes post! Also, why not head back and let me know how you got on!!?

Apple & Cranberry Chutney

Ingredients
  • 1kg cooking apples, peeled and chopped into small chunks
  • 500g eating apples, peeled and chopped into large chunks
  • 450g onions, sliced
  • 50g fresh root ginger, finely chopped
  • 1 tsp peppercorns
  • 500g granulated sugar
  • 250ml cider vinegar
  • 500g cranberries
Method
  1. Place all ingredients except cranberries in a large heavy-based saucepan, then gently heat, stirring, until the sugar dissolves. Bring to the boil, then reduce heat and simmer, uncovered, for about 50 mins, stirring regularly until the apples and onions are tender, the mixture has thickened and no watery juice remains.
  2. Add the cranberries, then cook for a further 10 mins or so until just softened but not burst.
  3. Spoon the hot chutney into sterilised jars and seal. Store unopened in a cool, dark place. The chutney will keep for up to 6 months. Chill on opening.
This is the latest recipe, another gift idea for your family, or why not just keep it for yourself!! This is a great recipe and thanks goes to the good people at Good Food magazine for this one!!
Hey! I'd love to know if people are using my recipes!! If you are leave a wee comment on the recipes post! Also, why not head back and let me know how you got on!!?

Chocolate Cake in a Jar


Ingredients

  • 125 g plain flour
  • 200g white sugar
  • 2g baking powder
  • 1g mixed spice
  • 75g butter
  • 60ml water
  • 25g cocoa powder
  • 60ml milk
  • 1 egg, beaten
  • 1tsp vanilla essence


Method

  1. Sterilize 2, 1 pint, straight sided wide mouthed jars and lids by boiling for ten minutes. Keep lids in the water until needed.
  2. Preheat the oven to 165 oC (325 oF).
  3. In a bowl mix together flour, sugar, baking powder and mixed spice.
  4. In another large bowl place butter, water and cocoa powder. Heat until butter melts and combine the ingredients.
  5. Stir in the flour mixture and blend. Add milk, egg and vanilla and beat until smooth.
  6. Distribute into the two jars and bake for 35 - 40 mins.
  7. Using oven mitts remove one jar at a time.
  8. Place the jars somewhere to cool.
  9. Store the cakes in the fridge or freezer until ready to give.
Made these today and they worked perfectly and they taste great!! Two didn't stay in their jars very long particularly when combined with the Luxury Hot Fudge Sauce.

I said that I was going to offer an idea for a Christmas present well, how about a few of these and a jar of the Fudge Sauce? Put them in a nice basket and watch them lick their lips!!! You'll notice that the recipe calls for two pint jars well I used five little 8oz jars (just under 1/2 pint) so that I could make little individual puddings for giving as gifts, but you can use whatever size jars you want!!


Hey! I'd love to know if people are using my recipes!! If you are leave a wee comment on the recipes post! Also, why not head back and let me know how you got on!!?

Luxury Chocolate Fudge Sauce

I couldn't wait, I have great ideas for Christmas Presents fo you lot to try and I am bursting to tell!! I can't let on just yet as I want to be able to give you guys photos and step-by-step and one of the most important parts of the recipe I haven't got, and won't be able to get them until the weekend. But as I am so excitable I have to put something up, a teaser if you like!! Then of course I have to hope my idea works and isn't a big disaster or else you will get a big picture of a sad face! Anyhoo, my teaser is the following recipe, for a Luxury Chocolate Fudge Sauce (yes, I did get my present idea from the previous post :) )
Ingredients
  • 340g/12oz granulated sugar
  • 85g/3oz brown sugar
  • 100g/3½oz cocoa powder
  • 30g/1oz plain flour
  • ½ tsp salt
  • 1 x 400g/14oz can evaporated milk
  • 250ml/9fl oz water
  • 2 tbsp butter
  • 2 tsp vanilla extract

Method
  1. Place the granulated and brown sugar, cocoa powder, flour and salt into a saucepan. Add the evaporated milk, water and butter and bring slowly to the boil, stirring constantly. Once boiling, cook for five minutes.
  2. Remove the sauce from the heat and allow to cool slightly. Stir in the vanilla extract.
  3. Serve poured over vanilla ice cream.

Make sure if you are jarring them up for presents, get your name on that label!! Heck, you made it!!

Hey! I'd love to know if people are using my recipes!! If you are leave a wee comment on the recipes post! Also, why not head back and let me know how you got on!!?

Hot Chocolate Fudge Sauce

The nights are drawing in and it is starting to get colder, we had the first morning of scraping the car windows just this past week. But why does the cold weather mean we should have to stop having all those tasty desserts? Like... ice cream! Too cold for ice cream? Not if we get some hot fudge sauce on it!!!!

Ingredients

4 ounces of chocolate
3 tablespoons of butter
2/3 cup boiling water
1 2/3 cups suger
6 tbsp corn syrup
1 tbsp vanilla extract

  1. Melt the chocolate oand butter on a low heat in a heavy saucepan.
  2. Carefully add the boiling water and stir well.
  3. Add the sugar and corn syrup and stir until smooth.
  4. Turn up the heat and stir until the mixture starts to boil, then maintain the heat at boiling point for 9 minutes.
  5. Remove from the heat and let it cool for about 15 minutes. Stir in the vanilla extract.
  6. Store in a microwave safe jar in the fridge.
  7. To use warm in the microwave for around 30 seconds.


Hey! I'd love to know if people are using my recipes!! If you are leave a wee comment on the recipes post! Also, why not head back and let me know how you got on!!?

Tizzalicious Crafts & Cuteness Giveaway!


It is not often that I come across a blog that really makes me sit up and take notice! There are many, many fabulous blogs out there but this one really caught my eye! A huge range of beautiful, and superbly made jewellery items (and more!). I have spotted several things that will be on my Christmas List!! Why not head on over and see what you want on yours? There will be something!!

Tizzalicious is currently running a lovely competition to win some earrings, like those in the picture above, and a matching ring! Go on!! Head over, you've got to be in it to win it!!

http://tizzlovescrafts.blogspot.com/

Spiced Sultana Cookies

Ingredients

145 g brown sugar
100 g white sugar
225 g butter, softened
3 eggs
15 ml vanilla extract
2 g baking soda
2 g salt
285 g white flour
250 g sultanas


Method
  1. Preheat the oven to 350 degrees F (175 degrees C).
  2. In a large bowl, cream together the brown sugar, white sugar, and butter until smooth. Beat in the eggs one at a time, mixing well after each one. Stir in the vanilla, salt, and baking soda until well blended, then mix in the ground pecans and flour. Stir in the chocolate chips last. Try not to over mix once you add the flour.
  3. Drop spoonfuls of cookie dough onto ungreased baking sheets so they are about 2 inches apart.
  4. Bake for 10 to 12 minutes in the preheated oven, until the cookies are just starting to brown at the edges. Let cool on the baking sheets for a few minutes before removing to cool on wire racks.
Hey! I'd love to know if people are using my recipes!! If you are leave a wee comment on the recipes post! Also, why not head back and let me know how you got on!!?

Pineapple Top & Tail Cheesecake

For the base
35g butter
85g reduced-fat digestive biscuits , finely crushed
For the filling
2 x 300g tubs light soft cheese
175g golden caster sugar
3 tbsp cornflour
1 tsp of pineapple juice
1 tsp vanilla extract
3 eggs , room temperature, beaten
150g fromage frais
8 slices of fresh pineapple, cubed
100g muscavado sugar
For the topping
35g butter
85g reduced-fat digestive biscuits , finely crushed

Method
  1. Heat oven to 180C/fan 160C/gas 4. Line a 20cm loose-bottomed or springform tin with baking parchment and stand it on a baking sheet. Melt the butter and stir in the biscuit crumbs. Press the mix into the base of the tin, then bake for 10 mins. Remove from the oven and raise the temperature to 240C/fan 220C/gas 9.
  2. Place the cubed pineapple and the sugar into a saucepan and allow to simmer for 10 minutes or until the pineapple has softened. Drain and place the cooked pineapple on the base.
  3. For the filling, beat the soft cheese just until smooth with an electric hand mixer on low speed. Gradually add the sugar, also on a low speed, then the cornflour without overbeating. Scrape the sides of the bowl. Slowly whisk in the pineapple juice, the vanilla, then the eggs. Scrape the sides of the bowl, then finally whiskin the fromage frais. The mixture should be smooth and quite runny.
  4. Pour the filling over the crumb base. Jiggle the tin to level the mix and squash surface bubbles with the back of a teaspoon. Bake for 10 mins, then lower the heat to 110C/fan 90C/gas ¼. Bake another 25 mins and, if you are using an electric oven, leave the oven door slightly ajar for the first 3 mins. After the 25 mins, shake the tin and there should be a wobble in the centre of the filling. If left until firmer it is more likely to crack later. Turn off the oven, keep the door closed and leave the cake in for 2 hrs. Open the door, loosen the top edges of the cake with a round bladed knife, then leave in the oven to cool gently for another 1-1½ hrs.
  5. Make the topping by mixing the crushed biscuits with the melted butter. Sprinkle over the top of the cheesecake and gently press (not too hard as you will damage the cheesecake). This can be down before the final 1 1/2 hrs of cooling in the oven.
  6. Move to the fridge to fully cool.
  7. Remove the from the fridge and hour before serving.
This was another big success at the Fireworks party along with the Pumpkin Cake. The cheesecake itself is very creamy and the pineapple gives it a certain sharpness! The 'tasters' seemed to really enjoy the 'base' on the top and bottom!!
Hey! I'd love to know if people are using my recipes!! If you are leave a wee comment on the recipes post! Also, why not head back and let me know how you got on!!?

Pumpkin Cake


Ingredients
  • 300g self-raising flour
  • 300g light muscovado sugar
  • 3 tsp mixed spice
  • 2 tsp bicarbonate of soda
  • 175g sultanas
  • ½ tsp salt
  • 4 eggs , beaten
  • 200g butter , melted
  • zest 1 orange
  • 1 tbsp orange juice
  • 500g (peeled weight) pumpkins or butternut squash flesh, grate
    For Drenching and Frosting
  • 200g pack soft cheese
  • 85g butter , softened
  • 100g icing sugar , sifted
  • zest 1 orange and juice of half

Method
  1. Heat oven to 180C/fan 160C/gas 4. Butter and line a 30 x 20cm baking or small roasting tin with baking parchment. Put the flour, sugar, spice, bicarbonate of soda, sultanas and salt into a large bowl and stir to combine. Beat the eggs into the melted butter, stir in the orange zest and juice, then mix with the dry ingredients till combined. Stir in the pumpkin. Pour the batter into the tin and bake for 30 mins, or until golden and springy to the touch.
  2. To make the frosting, beat together the cheese, butter, icing sugar, orange zest and 1 tsp of the juice till smooth and creamy, then set aside in the fridge. When the cake is done, cool for 5 mins then turn it onto a cooling rack. Prick it all over with a skewer and drizzle with the rest of the orange juice while still warm. Leave to cool completely.
  3. If you like, trim the edges of the cake. Give the frosting a quick beat to loosen, then, using a palette knife, spread over the top of the cake in peaks and swirls. If you're making the cake ahead, keep it in the fridge then take out as many pieces as you want 30 mins or so before serving. Will keep, covered, for up to 3 days in the fridge.


This was a big hit at the Fireworks bash! The icing is nice and orangey and for all those out there that say they don't like pumpkin, I would like to say that that was me but I really liked this cake (doesn't taste of pumpkin!!). This was served as an option for dessert along with Pineapple Top & Tail Cheesecake

Hey! I'd love to know if people are using my recipes!! If you are leave a wee comment on the recipes post! Also, why not head back and let me know how you got on!!?

The Guy Cometh..

Well, November the 5th is here!
Remember, Remember the 5th of November
Gunpwder, treason and plot.
I see no reason that gun powder treason
should ever be forgot!
And it won't be, this Saturday is the long awaited Bonfire/Firework party! Not sure what the current guest count is, not as many as hoped but still enough to make my mum run round like a headless chicken! But as promised I will start adding the recipes that are going to grace the tabel at the party so you to can enjoy the toasty, tasty smells of Bonfire Night! As you can see I have already added a wonderful Cheesy Pepper Bread, now this is great and by peppers I mean capsicum types, not black pepper! I usually make bread, with the yeast and the waiting and the kneading and the more waiting and the cooking but this was SO fast, 40 minutes, total time. Only 30 minutes to cook! Seriously give it a go, I served it last night as a side to chilli (basically couldn't wait till Saturday to try it!) and oh boy!! It is also freezable (I have included instructions on how to re heat, in the recipe). What else is going to make it to the table? Well, the Baked Toffee Apple Tart making a comeback after its big debut success! But also a nice Pumpkin based cake, forward thinking you see, from the old Halloween Jack o Lantern! And, after a suggestion from one of my visitors a Pineapple Cheesecake - but with this one I am going - individual.... In terms of the main courses.. HA! Who needs 'em, bring on the sugar!! No, I am not incharge of the main courses, got mum on that one, but I am going to try a slight variation on the Barbeque Skewers marinade, but change it to suit chicken, we'll see how that goes!
Oh and you may have noticed Rose's Guides in the left bar, well this is the start of some guides I am writing to try and help all those new chefs out there! They are still needing additions and there are many more to come but if you have any suggestions to improve what's there or anything you would like to see added let me know!!

Cheesy Pepper Bread

Ingredients
  • 200g wholemeal flour
  • 200g plain flour , plus extra for dusting
  • 1 tsp bicarbonate of soda
  • 2 tsp cream of tartar
  • 1 tsp salt
  • 1 tsp caster sugar
  • 25g butter , melted
  • 300ml milk , at room temperature
  • 175g cheddar , coarsely grated
  • 3 tbsp pumpkin seeds
  • 85g ready-roasted peppers from a jar, drained and chopped
Want to give it a go? Download the .pdf version, easier than writing it out!!

Method


  1. Heat oven to 190C/fan 170C/gas 5. Sift the dry ingredients into a large bowl and make a large well in the middle. Combine the melted butter and milk, then pour into the well. Mix to a soft dough.
  2. Dust the work surface with flour. Add most of the cheddar, 2 tbsp of the pumpkin seeds and the chopped peppers to the dough. Gently knead to combine on the floured surface. Divide into 8 lumps and shape into rough rounds two finger-widths deep.
  3. Place the pieces side by side on a floured baking sheet, scatter the remaining cheddar and pumpkin seeds over the top and bake for 30 mins until golden brown and the cheese is bubbling. Cool on a wire rack and eat while warm. The bread can be frozen at this point. To reheat, wrap the bread tightly in foil and bake at 200C/fan 180C/gas 6 for about 30 mins.
This bread is great! I made it into 16 smaller little rolls, which I put with some of the left over chilli. I am saving the rest for the Bonfire party on this Saturday!! This is such an easy bread to make and because it has no yeast it doesn't require rising time and doesn't take nearly as long to bake!

Hey! I'd love to know if people are using my recipes!! If you are leave a wee comment on the recipes post! Also, why not head back and let me know how you got on!!?

Simple Chilli Nachos


Ingredients
1 tbsp oil
2 medium onions
1 green pepper
1 garlic clove , peeled & crushed
1 heaped tsp hot chilli powder (or 1 level tbsp if you only have mild)
1 tbsp flour
1 large tin of red kidney beans
1 beef stock cube
2 tbsp tomato puree
400g tortilla chips
grated cheese, sour cream and salsa to serve.

Method
  1. Pre-heat oven to 180 oC.
  2. Chop the onion and add to a frying pan with the garlic and the oil. Fry for 6 - 8 minutes.
  3. Add the minced beef to the onions and brown. Add the flour, this will absorb the liquid that has been produced.
  4. Using the stock cube make 1 pint of stock. Add the tomato puree to the stock and mix well. Add to the beef and onion mixture.
  5. Drain the kidney beans and add, along with the Chilli powder.
  6. Transfer the mixture to an oven proff casserole dish and cook for 1 hour.
  7. Remove from oven and add the chopped green pepper.
  8. Return the mixture to the oven for another 30 minutes.
  9. To serve: line the bootom of your serving dish with the tortilla chips, spoon your chilli over the chips. Top with grated cheese, return to the oven breifly to allow cheese to melt fully. Top with soured cream and salsa.
This was really tasty and great for munching while you are watching a film!! It is also a nice simple recipe for anyone wanting something easy and impressive. As you can see it is quite a long cooking time so, give yourself time - unlike me who started it about 8pm! Oh and watch the tops of those tins, VERY sharp, I know!!!
Hey! I'd love to know if people are using my recipes!! If you are leave a wee comment on the recipes post! Also, why not head back and let me know how you got on!!?

Guy Fawkes Night

With so much excitement about Halloween out there poor old Guy Fawkes night is being lost. So, as this holiday is one I celebrate more than Halloween I thought I would do a Guy Fawkes tribute post. As it is such a big event in my life I often forget that people outwith Britain are probably completely unaware of Guy Fawkes Night, as its roots are in British History.

Who was this Guy Fawkes?
Guy (Guido) Fawkes Night (or Fireworks Night or Bonfire Night) is on the 5th of November. To remember the failed assassination attempt, by a group of English Catholics, on King James I and his family by blowing up the Houses of Parliament during the State Opening on 5th November 1605. Although several men were involved in the plot Guy Fawkes is remembered as he was the explosives expert in charge on the detonation itself. They, after obtaining the lease to one of the stores under the Houses of Parliament, filled the room with 36 barrels of gunpowder, under a store of winter fuel.

The plot was uncovered because several members of the conspiracy were concerned about the fact that several of their Catholic friends would be present and subsequently killed. So they sent letters advising that they should not attend. Although the conspirators were aware that 'the secret was probably out' they continued with the plan. Guy Fawkes was discovered, 'lighter' in hand and arrested. On his arrest he far from denied his involvement he declared that it was his intention to kill the King and his family.

Fawkes was interrogated under torture (which was only permissible at the time with direct orders from the King) and revealed the names of all the conspirators. The other were eventually arrested and after trial all were sentenced to be Hung, Drawn and Quartered

Why did they want to kill the King?
Essentially, they believed that the tolerance for Catholicism in England would continue to drop under the leadership of James I so wished to remove him from the throne and, due to the laws of succession, Princess Elizabeth, would become Queen - a Catholic Queen.
How do we celebrate?
Traditional celebration involves the creation of a 'Guy' a man, usually made from straw or newspaper stuffed clothing, being placed on top of a bonfire and burned (only when I write this down do I realise how morbid that is!). Children usually make the guy and often went around the towns with their 'Guy' collecting money -
"Penny for the Guy?"
The money would then be put towards buying fireworks.
As a side note this is how the term 'Guy' came to mean 'Man'
Many places still put the Guy on top of the fire but most of the true meaning is lost to history. The fireworks are still popular, why the term Fireworks Night, came to replace Guy Fawkes Night. In the week running up to and including (and usually past!) fireworks are let off by individuals or a larger town events. There is usually a barbeque and toffee apples and it is a very social and exciting time.

So it is off to a Fireworks party I go in two weekends time, the 8th. Plenty fireworks, and tasty food, I'll get some recipes up for things you can make for it! I recommend making some Toffee Apples, kids'll love 'em!! As a little taster why not try the Rocky Road recipe, its really easy, kids can help out and it always reminds me of Bonfire Night!!

Here ends my salute to Guy Fawkes Night!

Rocky Road


Ingredients

  • 100g butter
  • 150g dark chocolate
  • 150g milk chocolate
  • 3 tbsp golden syrup
  • 150g digestives , roughly crushed
  • 200g , marshmallows quartered (use scissors)


Method

  1. Gently melt the butter, chocolate and syrup in a pan over a low heat, stirring frequently until smooth, then cool for about 10 mins.
  2. Stir the biscuits and sweets into the pan until well mixed, then pour into a 17cm square tin lined with foil and spread the mixture to roughly level it. Chill until hard, then cut into fingers.

Want to give it a go? Download the .pdf version, easier than writing it out!!


After a discussion on the Blog Catalog forum about digestive biscuits I just had to make some Rocky Road, I love this and for some reason I associate it with Bonfire Night, don't know why. However, it is not one of the things that I am taking to the Bonfire Party at my Mum's, there is a whole host of recipes coming your way for that!!!

Hey! I'd love to know if people are using my recipes!! If you are leave a wee comment on the recipes post! Also, why not head back and let me know how you got on!!?

Steak Parcels

Ingredients
(Makes 3 Parcels)

3 Minute Steaks
1 Red Pepper
4 or 5 mushrooms
3 tblsp soft cream cheese
3 rashers bacon (either smoked or unsmoked)
salt and pepper

Method

Place the a steak onto a piece of grease-proof paper. Slice the pepper and mushrooms into bite sized chunks. Put a tablespoon of cream cheese onto the steak ans sprinkle over a third of the peppers and a third of the mushrooms. Cut a bacon rasher into strips and place them onto the steak. Season with salt and pepper.

Fold the greaseproof paper around to make a parcel and place on a baking tray. Repeat with the other two parcels. Place in a very hot oven, 200oC for around 20 minutes. If you want to brown the meat slightly then open the parcels a bit for the last 5 minutes.

To serve you can either remove the steaks from the paper, as shown in the picture, or for a bit of interest why not serve the steak in the paper.


Want to give it a go? Download the .pdf version, easier than writing it out!!


This happened as a result of me planning one meal and then finding out I didn't have the ingredients I needed! That's the first step for cooking, be prepared...

Hey! I'd love to know if people are using my recipes!! If you are leave a wee comment on the recipes post! Also, why not head back and let me know how you got on!!?

10 Days to Faster Reading

I have just finished the 10 Days to Faster Reading book by Abby Marks Beale. It was excellent. It talks you through various techniques for speeding up not only your reading but your comprehension as well. At first I was dubious as to whether this would work, sometimes it felt as if I was just skimming across the words without really taking anything in! But I was! After each exercise there was a comprehension test which asked questions about what you had just read and I was astonished that I was actually remembering and taking in the information!!

I would definately recommend this book to anyone wanting to speed up their reading, or even to people who are just interested in the techniques! You will not be disappointed! I doubled my reading speed over the 10 days, and if i'm honest I didn't put in as much practice as was recommended! I went up to 480 words per minute with an 80% comprehension rate! I intend to continue practicing the techniques in the book to try and increase this further.

The book also recommends further titles to extend your abilities!

Seriously, give it a go!!


Crunchy Oat Biscuits


Ingredients
  • 115g butter
  • 2 tbsp golden syrup
  • 115g self-raising flour
  • 115g light brown, soft sugar
  • 115g rolled oats
  • 115g sultanas
  • 2tsp water
  • 1tsp mixed spice


Method
  1. Pre-heat the oven to 150oC.
  2. Gently melt the butter and syrup in a saucepan.
  3. Mix the flour, sugar, spice, sultanas and oats together in a bowl.
  4. Stir in the melted butter together with the water and combine well.
  5. Leave mixture to cool for 5 minutes then mould into balls and place well apart on a baking tray.
  6. Bake for around 25 minutes then remove from oven, allow to cool slightly before turning onto a cooling rack.

Want to give it a go? Download the .pdf version, easier than writing it out!!
These are wonderfully easy and taste great, the best way to fill up the biscuit barrel!! This recipe should make around 30 biscuits but of course you can make them as big or as small as you want!!! This is a great recipe for beginners in the kitchen with quick tasty results!!
Hey! I'd love to know if people are using my recipes!! If you are leave a wee comment on the recipes post! Also, why not head back and let me know how you got on!!?

This Weekend..

No recipes today I am afraid as I have been away, and by 'I' I mean 'We'. We decided to have a short break, very short, just one night, in the Lake District so we went online on Wednesday night, picked a B&B and nooked it Thursday! In the car Friday and we were off! We made a stop on the way down at a Lead Mining Museum, I have driven past the sign for this SO many times so this time we stopped! And we were glad we did, Not only are you surrounded by some brilliant countryside but the museum offers a guided tour through a mine, into old miners cottages and round the first, and biggest, subscription library in Scotland. The tour guide was great, we were a small party just us two and a family of four but that was perfect as it allowed for plenty questions.

After the Mining Experience we were back on the road and arrived in Keswick at about 6.30pm, just as the B&B lady had given up on us and started on her tea... oops!! We headed into town for our tea and ended up in an Indian resturant, after walking all over Keswick trying to find a Mexican we had seen an advert for!! After my first experience in an Indian Resturant, I was keen to give it another go!!

The following day the weather was umm... seasonal with winds only gusting to 110mph, breezy!!! It was also accompanied by rain so we stuck to indoor pursuits, first off was a puzzle museum with all sorts of optical illusions, holograms, stuff like that!! There were even optical illusions that you could be part of... take a look at the crazy photos, I swear I have done nothing to them!! Seriously, if you go to Keswick ever go take a look at this place!!
Second stop was the Pencil Museum, the only one if its type in the world. Again another interesting stop and well worth a visit, all about the history of pencils and also how they are made!! The Pencil Museum signalled the eend of our little break but we have both enjoyed it immensely!! So it was off home where we decided there was still time so went to see Saw V at the cinema!!

Thanks Everyone

I would just like to say thanks to everyone that has been visiting the site lately, it is great to see you all. I hope you like what you see and I hope that some of the recipes have inspired you to give them a go!! If you do have a shot come back and let me know how it went, just leave a comment under the recipe post!! I'd love to hear that people are getting enjoyment out of these recipes too!!!
I have seen that a couple of people visiting think they aren't great at cooking, well, I am currently working on something to help you out and hopefully change your minds!! Give me a week and there will be a grand unveiling!!
Just a bit about the weather, I just had to say this! About three days ago I was driving into work thinking that suddenly it had gone all Autumnal, all the trees are red, gold and yellow and how nice everything looked! Ahh! How beautiful is Autumn.. Well, not now, now it is pouring with rain, and pretty much has since I noticed the beauty... thanks world :)

Banana & Apple Loaf

Ingredients

2 ripe bananas
1 level tablespoon bicarbonate of soda
2 tblsps boiling milk
100g soft margarine
175g caster sugar
2 eggs
225g plain flour
1 level tsp baking powder
1 apple (I used a bramley apple!)
1 tsp mixed spices
Method


  1. Pre-heat the oven to 180oC then grease and line a 2lb loaf tin.
  2. Peel the bananas, put them in a large bowl and mash well.
  3. Peel and chop the apple into small chunks.
  4. Dissolve the soda in the milk and add to the mashed banana, together with the remaining ingredients and mix very thoroughly for 2 to 3 minutes.
  5. Pour into the tin and bake for 1 to 1 1/4 hours or until the loaf is well risen and golden brown.
  6. Remove from oven and cool slightly before turning out the loaf and leaving to cool fully.
Want to give it a go? Download the .pdf version, easier than writing it out!!
This is a very, very moist loaf but tastes great! Use a plate! The chunks of apple really heighten the flavour and the bananas give just a soft under flavour! I love simple cakes and loaves and what is simpler than this? Bung it in a bowl, mix, bake! Awesome!
Hey! I'd love to know if people are using my recipes!! If you are leave a wee comment on the recipes post! Also, why not head back and let me know how you got on!!?

Honey Barbeque Sauce

After all the excitment of cooking those Barbeque Skewers I decided to have a little bit of creative time when it came to cook those old, cheap chicken legs from the freezer. These things were left over from a barbeque a few weeks ago. The usual, buy one get one free pack, one gets eaten, one goes in the freezer and forgotten about!!! So I decided to release the chicken! I wanted to do a roast on Sunday but hadn't the time to cook a whole chicken, so I defrosted those legs and roasted them!! But I created my own spicy honey glaze for them, read on...
Ingredients
(for 7 chicken legs)
3tblsps clear honey
1 tsp paprika
1 tsp cumin
1 tsp cayenne pepper
salt
black pepper
couple of drops of tabasco sauce
I roasted the chicken legs as normal, with a bit of olive oil and salt and pepper.
To make the glaze I just mixed all the ingredients above together.
Then 20 minutes before the end of their cooking time I poured on my glaze, making sure I covered all of the legs.
Back into the oven. Don't worry if it looks like the glaze has all run off the chicken, the honey will boil in the oven, bubbling over the chicken legs and caramalize on them as it does so. Turn the legs once after about ten minutes.
Don't worry about burning, or charring of the skin, makes them taste better!!
I am afraid that I don't have a picture this time, but I will try to get one as I want to try these on the barbeque at the Fireworks party!! Along with making that Baked Toffee Apple Tart. If anyone tries this let me know how it goes. I may try altering the spices to make it a bit spicier next time, this could turn into a challenge.
Honey Glaze Challenge, take the base above and add to it to make your own creation! Come back here and share it with everyone!!!

Cherry Cake


Ingredients

175g glace cherries
225g self raising flour
175g soft margarine
175g caster sugar
juice of half a lemon
50g ground, or chopped, almonds
3 large eggs
Want to give it a go? Try the Download version, easier than writing it out!!
Method:
  1. Pre-heat oven to 180oC and grease and line 7 inch cake tin, round or square.
  2. Cut each cherry into quarters, put in a sieve and rinse under running water. Drain well and dry very thouroughly on kitchen roll.
  3. Cream together the butter and sugar until light and fluffy.
  4. Add in the eggs a combine.
  5. Mix in the flour, almonds and lemon juice.
  6. Once mixture is well combined fold in the cherries.
  7. Turn into the prepared cake tin and cook for around 1 1/4 hours, or until a skewer comes out clean.
  8. Turn onto cooling tray for 10 mins before turning out.
  9. Store in an air tight container.
I made this at the request of David, he likes his Cherry Cake so my idea of Banana Loaf didn't go down too well! But this cake is amazing! As you can see, my cherries sank, I have yet to master how to stop that happening, but the cake tastes great and it is SO moist. You can hear that soft moist sound when you break a piece off!! Amazing!!
Hey! I'd love to know if people are using my recipes!! If you are leave a wee comment on the recipes post! Also, why not head back and let me know how you got on!!?

Freebie of the Week

Win a Years Free Shopping from Sainsbury's!! How much food would that be? Pig out!!!

http://www.emailinform.com/free-competitions/sainsburys/PageGen.asp

Celebratory Meal

Well, it was David's last day with his current work, yesterday, so I decided to cook him a celebratory dinner, I have listed the recipes below incase you guys want to try them out!! The skewers were really tasty and I would love to try them out on the barbeque some time!

I have been asked by a friend of my mum's for a recipe I made at Christmas last year. I will put it up on here at some point, as it got such good reviews with my family and friends (enough that they want to make it themselves) I figure it must be good enough for here! Unfortunately, I won't have a picture to go along with it but the next time I make it I will get it up for you!! It is a mint chocolate mousse, but it is very heavy and solid, definately not for the faint hearted!!!!

Happy cooking people!!

Lime and Honey Parfait with Seasonal Fruits


Ingredients


3 limes, juicy
125ml clear honey
3 egg whites
120ml whipping cream

For the summer berries:


2 limes
400g Raspberries
100ml clear honey
200g Blackberries
200g Blueberries

Method


  1. First make the parfait. Using a fine bladed grater, remove the zest from the limes. Juice the limes, then reserve the zest and juice together.
  2. In a small, heavy-based saucepan, boil the honey for 3 minutes, until the honey begins to caramelise. Add in two-thirds of the lime juice and zest and boil for about a minute. If you have a sugar thermometer the temperature should be 121ÂșC.
  3. While the honey is boiling, use an electric mixer to whisk the egg whites in a mixing bowl to very firm peaks.
  4. Pour the hot honey and lime mixture, in a slow steady steam, onto the beaten egg whites, whisking continually. Be careful to incorporate the egg whites evenly, taking care that the mixture does not harden around the edges of bowl. Continue whisking until the mixture is cool.
  5. In a separate bowl, whisk the whipping cream until firm but not hard.
  6. Gently fold the whipped cream into the egg white mixture along with the remaining fresh lime juice and zest. Be careful not to over-mix as you will lose volume.
  7. Divide the mixture into six 150ml ramekins or one large container and freeze for at least six hours.
  8. To make the summer berries, squeeze the juice of 1 lime. Liquidise one punnet of raspberries with the honey and lime juice. If the mixture is a little thick, just add a few tablespoons of water.
  9. Strain the raspberry mixture through a sieve into large bowl and toss in the second punnet of raspberries, the blackberries and the blueberries.
  10. To serve, spoon the berry mixture into six bowls. Dip the bottoms of the parfait moulds into hot water, turn the frozen parfaits out and place each parfait in the centre of each berry-filled bowl.
  11. Finely zest the second lime and scatter the lime zest over each portion, then, finally squeeze over a little lime juice over each dessert and serve at once.

This was very light but very limey! I made it as one large block, rather than the seperate ramekins. It was very much like a sorbet type sensation, very cold and fresh followed by a strong citrus blast!! It was great with the summer berries!

Hey! I'd love to know if people are using my recipes!! If you are leave a wee comment on the recipes post! Also, why not head back and let me know how you got on!!?

Barbeque Skewers

Ingredients

½ teaspoon cumin seeds
1 teaspoon fennel seeds
2 cloves
1 heaped tablespoon sweet smoked paprika
zest and juice of 1 orange
a small bunch of fresh thyme, very finely chopped
4 garlic cloves, peeled and very finely chopped
150ml/5½ fl oz Heinz organic tomato ketchup
6 tablespoons balsamic vinegar
4 x 400g/14oz pork fillets
sea salt and freshly ground black pepper
a handful of fresh coriander
juice of 1 lemon


Method

  1. Crush up the cumin, fennel seeds and cloves in a pestle and mortar and mix with the paprika, orange zest and juice, thyme, garlic, ketchup and balsamic vinegar.
  2. Season the pork fillets with salt and pepper, then toss them in most of the marinade until completely coated. Feel free to marinate for half a day, but at least an hour.
  3. If you have metal or wooden skewers, lay the fillets side by side and skewer them together about 2.5cm/1 inch apart.
  4. When you're ready to cook, simply put the meat on to a barbecue or under a hot grill for 15 to 20 minutes or until nicely charred.
  5. Every time you turn the meat, brush it generously with the leftover marinade so you build up a sticky, blackened glaze.
  6. Slice the meat between the skewers, or just slice each fillet in half, and sprinkle over some chopped coriander or squeeze over some lemon juice if you fancy.
This makes a very orangey glaze so if you aren't that keen just leave out the orange. As you can see I just served it with rice which was nice, its neutral taste against the strong flavours in the pork marinade. It says to blacken it, setting it alight certainly does this (*cough*) but I don't recommend it!!!
Hey! I'd love to know if people are using my recipes!! If you are leave a wee comment on the recipes post! Also, why not head back and let me know how you got on!!?

Fried Mozzarella Parcels

Ingredients

For the mozzarella
8 slices of white bread, thinly sliced
200g/7oz buffalo mozzarella
2 medium eggs
125ml/4fl oz milk
6 tbsp plain flour


Method
  1. To make the mozzarella, cut the crusts off the bread and cut into slightly larger discs than the mozzarella slices.
  2. Slice the mozzarella into into four thick slices about 1cm/0.5in thick.
  3. Beat the eggs lightly and season with salt and pepper.
  4. Dip the slices of the bread on one side into the milk and then place a slice of the mozzarella on the dry side.
  5. Season the mozzarella and make a sandwich with the other slice of bread, milk-soaked side on the outside.
  6. Dust the sandwich with flour and then soak into the beaten egg.
  7. Deep fry the sandwich in a hot fryer until golden coloured and crisp on the outside.
  8. Drain on to kitchen paper and place the hot sauce on the plate, place two of the slices in the middle and serve.
I also added a fresh basil leaf into each parcel just to give it that extra flavour. DOn't worry if it looks like the parcels are not staying together, they join up and seal once you start frying them! This gets very messy so keep a cloth nearby!! The sauce is a cranberry and raspberry jelly.
Why not try it with a blue cheese or a strong cheddar?
Hey! I'd love to know if people are using my recipes!! If you are leave a wee comment on the recipes post! Also, why not head back and let me know how you got on!!?

The Clock is ticking.... along nicely!!

Just thought you might like an update on the old clock front! Well, as you can see it now has a completed frame! I suppose it looks a bit like a clock, well more like a clock than a pile of square cardboard tubes!
I am actually, by the looks of my instructions going to be starting the workings of the clock in the next run so I am a bit paranoid now that if it isn't exactlly right this may be a disaster, and as I have chosen to post about it, everyone will now of my failure!!

Oh the humanity!!

Flower Bargain!!!

Just thought I had to add this in!
When do you buy flowers?
I'll tell you when, Saturday night, 8pm, Tesco! That's even the where too!!
The picture, lovingly edited with Paint, shows three bunches of flowers: the tulips, the pink roses in the main vase and all the other flowers in the vase. Now, what did I pay fro all three?
How much!!? How MUCH!!? I hear you scream.
Well, drum roll please
dun dun d-d-dun dun dun duuuuunnnn

69p

Yep! It's true! I do get worked up over silly little things!

Halloween's Around the Corner

Well, I said that I was going to experiment with an adult version of the Toffee Apple for my mum's fireworks party! And I have done, I have put the recipe up for all you lovely people to see the fruits of my labours! (And those fruits are apples mind!) I think that it could maybe do with a tweak here and there, but it is more in presentation than in method! I think it will be popular to cold, hungry people watching fireworks (it certainly was with my taste testers), and I really think it captures something about Autumn and the fireworky/halloweeny feel of this time of year. Make sure you have it nice and warm and straight out of the oven though!!

I thought I would add these photos of our stupid cat, he has taken a liking to the fish food we give to our pond fish, and the fact the tub is nearly empty doesn't stop him from getting his fill! I was tempted, I admit it, to put the lid on but I didn't! To be honest I don't think he would have noticed, as long as he had his fish food....

Baked Toffee Apple Tart

Ingredients:

Sweet Shortcrust Pastry
3-4 Cooking Apples
2 x 400g tins of Condensed Milk
120g butter, melted
4 tblsps golden syrup
Icing sugar to dust
Brown sugar, for topping

Method
  1. Roll out pastry and line an 11 inch tart mould. Place in freezer for an hour.
  2. Pre-heat oven to 180oC.
  3. Remove tart mould from freezer and bake blind for 15 minutes.
  4. Peel, core and slice your apples. Dust with icing sugar and set to the side.
  5. Combine condensed milk, butter and golden syrup in a saucepan over a medium heat. Cook, whisking, for 10-12 minutes or until golden.
  6. Pour over the cooked tart base. Arrange the apple slices on top and pour over any juices, sprinkle with brown sugar.
  7. Cook in the oven for 40 minutes. Cover with greaseproof paper to prevent the apples burning, you can remove it towards the end of the cooking to allow them to brown a little.
  8. Serve warm with cream or ice-cream.
This creates a very thick layer of caramel so you may wish to reduce the amounts according to taste (or increase them!). This was another success! A nice variation on the traditional apple pie.
Hey! I'd love to know if people are using my recipes!! If you are leave a wee comment on the recipes post! Also, why not head back and let me know how you got on!!?

Flour Tortillas


Ingredients

500g plain flour, sieved
0.5 tsp Baking powder
1 pinch Salt
100g lard
120ml warm water


Method
  1. Place the flour, baking powder and salt into a large bowl, rub in the lard.
  2. Add the water in a steady stream, and combine, until the mixture becomes a stiff but pliable dough.
  3. Turn the dough out onto a floured surface and knead for 10-15 minutes until smooth and elastic.
  4. Divide the dough into 12 equal sized pieces and roll each piece out to form a 30cm circle. Cover with cling film to prevent them drying out.
  5. Warm a heavy frying pan or griddle and cook each tortilla for 1 minute on each side, until the surface bubbles and has turned a light golden colour.
  6. Wrap the tortillas in a clean tea towel to keep them warm and pliable until you have cooked them all and are ready to use them. Fill as desired.
Made these as a very cheap alternative to the bought ones. They start off very crispy and you don't think that you will be able to roll them but pop them in the microwave for about a minute on high and they will be just perfect! Happy Mexican!!
Hey! I'd love to know if people are using my recipes!! If you are leave a wee comment on the recipes post! Also, why not head back and let me know how you got on!!?